on
react 생명주기(LifeCycle)
react의 생명주기(LifeCycle)
react에서는 props와 state의 변화에 따라 생성, 변경, 삭제 등이 실행되고 그 과정들을 생명주기(Life Cycle)이라고 한다.
react의 LifeCycle을 보기에 앞서 class component와 functional component의 구조를 알아보자.
class component와 functional component의 구조 비교
class component
import React, { Component } from "react";

export default class ClassComponent extends Component {
  constructor(props) {
    super(props);
    this.state = { date: new Date() };
  }
  componentDidMount() {
    this.timerID = setInterval(() => this.tick(), 1000);
  }
  componentDidUpdate() {
    console.log("componentDidUpdate");
  }
  componentWillUnmount() {
    clearInterval(this.timerID);
  }
  tick() {
    this.setState({
      date: new Date(),
    });
  }
  render() {
    return (
      <div>
        <h1>Hello, world! It's Class</h1>
        <h2>It is {this.state.date.toLocaleTimeString()}.</h2>
      </div>
    );
  }
}
class component에서의 상태관리는 용도에 따라서
- constructor
- componentDidMount
- componentDidUpdate
- componentWillUnmount
- … 등으로 관리한다.
functional component
import React, { useState, useEffect } from "react";
export default function FunctionalComponent() {
  const [date, setDate] = useState(new Date());
  const tick = () => {
    setDate(new Date());
  };
  useEffect(() => {
    const interval = setInterval(() => tick(), 1000);
    return () => {
      clearInterval({ interval });
    };
  }, []);
  return (
    <div>
      <h1>Hello, world! It's Functional</h1>
      <h2>It is {date.toLocaleTimeString()}.</h2>
    </div>
  );
}
functional component에서의 상태관리는 대부분 hook으로 관리한다.
hook이 나오기 이전에는 함수형 컴포넌트로 상태를 관리할 수가 없었다.
props로 받아서 사용할 때만 함수형 컴포넌트를 사용했다.
hook이 나오면서 함수형 컴포넌트에서 상태관리를 할 수 있게 되었고, 다양한 재사용 기능을 사용할 수 있게 됐다.
주의
state를 직접 변경하는 값을 넣게 되면 리렌더링이 일어나지 않는다.
class component lifecycle 메소드 살펴보기
import React, { Component } from "react";

export default class LifeCycle extends Component {
  //초기화
  constructor(props) {
    super(props);
    console.log("constructor");
    this.state = { date: new Date() };
  }

  //처음 렌더링 될때
  componentDidMount() {
    console.log("componentDidMount");
    this.timerID = setInterval(() => this.tick(), 10000);
  }

  // 값이 업데이트 될 때
  componentDidUpdate() {
    console.log("componentDidUpdate");
  }

  // 컴포넌트가 사라지기 직전 , 타이머 제거 및 요청 취소 및 구독해제 등
  componentWillUnmount() {
    console.log("componentWillUnmount");
    clearInterval(this.timerID);
  }

  tick() {
    // console.log("tick");
    this.setState({ date: new Date() });
  }

  render() {
    console.log("render");
    return <div>LifeCycle</div>;
  }
}
class component에서 내장함수가 아닌 새로 만든 custom 함수에서 바로 this.state로 접근할 수 없다.
custom 함수에서 this.state에 관여하고 싶을 때는
constructor에서 바인드 시켜주거나 (.bind(this);)- 함수를 화살표 함수 arrow function으로 만들어준다.
arrow function은 바깥과의 constructor를 공유하기 때문에 this를 알고 있다.
constructor에서 바인드하는 예시
import React, { Component } from "react";

export default class LifeCycle extends Component {
  constructor(props) {
    super(props);
    this.state = { date: new Date() };

    // 아래 handleClick()에서 this에 바로 접근할 수 없기때문에 바인드 시켜준다
    this.handleClick = this.handleClick.bind(this);
  }
  componentDidMount() {
    this.timerID = setInterval(() => this.tick(), 10000);
  }
  componentWillUnmount() {
    clearInterval(this.timerID);
  }
  tick() {
    this.setState({ date: new Date() });
  }
  handleClick() {
    alert(this.state.date);
  }
  render() {
    return (
      <div>
        <h1 onClick={this.handleClick}>LifeCycle</h1>
      </div>
    );
  }
}
함수를 arrow function으로 만들어주는 예시
(handleClick())
import React, { Component } from "react";

export default class LifeCycle extends Component {
  constructor(props) {
    super(props);
    console.log("constructor");
    this.state = { date: new Date() };
  }
  componentDidMount() {
    console.log("componentDidMount");
    this.timerID = setInterval(() => this.tick(), 10000);
  }
  componentWillUnmount() {
    console.log("componentWillUnmount");
    clearInterval(this.timerID);
  }
  tick() {
    this.setState({ date: new Date() });
  }
  // arrow function
  handleClick = () => {
    alert(this.state.date);
  };
  render() {
    return (
      <div>
        <h1 onClick={this.handleClick}>LifeCycle</h1>
      </div>
    );
  }
}
react 생명주기 다이어그램
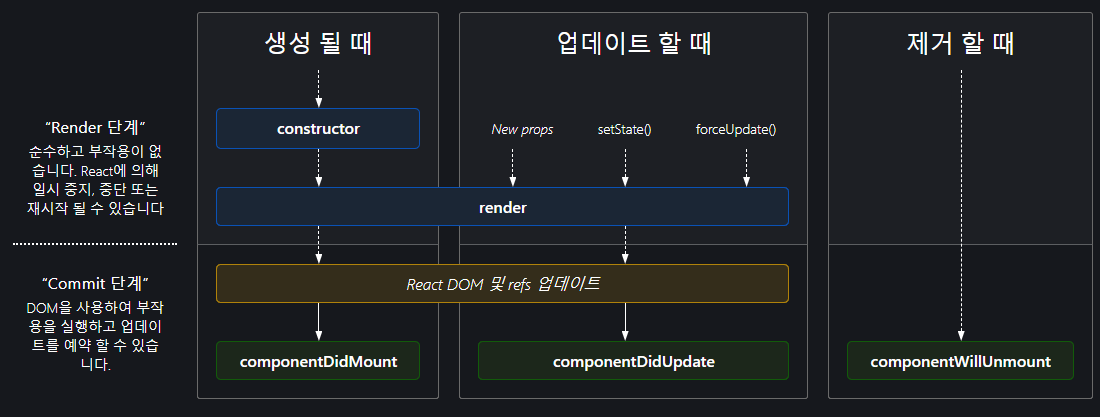
https://projects.wojtekmaj.pl/react-lifecycle-methods-diagram/
생명주기 methods 좀더 알아보기
react의 component는 생성 -> 업데이트 -> 제거 순의 생명주기를 가지고 있다.
constructor(props)
컴포넌트를 새로 만들 때마다 호출되는 클래스 생성자 메소드
this.state의 초기값 적용, 이벤트 처리 메서드를 바인딩하기 위해 사용.
해당 컴포넌트가 마운트되기 전에 호출해야한다.
this.props가 생성자 내에서 정의되도록 super(props)를 꼭 호출해야 한다.
state값을 변경하고 싶다면 constructor 외부에서 this.setState()로 변경해야지 내부에서 this.setState()를 호출하면 안된다.
state를 초기화하거나 메소드를 바인딩하는 작업이 없다면 constructor는 없어도 된다.
getDerivedStateFromProps()
props값을 state와 동기화하고 싶을 때 만든다. v16.3 이후에 만들어졌다.
다른 생명주기 메서드와는 달리 앞에 static 을 필요로 하고, 이 안에서는 this를 조회 할 수 없다.
여기서 특정 객체를 리턴하게 되면 해당 객체 안에 있는 내용들이 state로 설정이 된다.
컴포넌트가 처음 렌더링 되기 전에도 호출 되고, 리렌더링 되기 전에도 매번 실행된다.
사용예시
static getDerivedStateFromProps(nextProps, prevState) {
  console.log("getDerivedStateFromProps");
  if (nextProps.name !== prevState.name) {
    return { name: nextProps.name };
  }
  return null;
}
shouldComponentUpdate()
component가 업데이트를 할지, 말지 정하는 것. false or true
컴포넌트를 최적화하는 작업에서 매우 유용하게 사용된다.
현재 컴포넌트의 상태가 업데이트되지 않아도 부모 컴포넌트가 리렌더링되면 자식 컴포넌트들도 리렌더링 되는 데 이때 데이터 변화가 없으면 DOM은 조작하지 않고 Virtual DOM에만 리렌더링을 한다.
이 불필요하게 Virtual DOM에 리렌더링하는 것을 방지하기 위해 사용하고 기본적으로 true를 반환하고 필요에 따라 false를 반환하면 해당 조건에서는 render()를 호출하지 않는다.
getSnapshotBeforeUpdate()
실제로 브라우저에 반영되기 직전의 값을 확인할 수 있는 것.
- render()
- getSnapshotBeforeUpdate()
- 실제 DOM에 변화 발생
- componentDidUpdate
이 4가지 시점에서 발생한다.
DOM 변화가 일어나기 직전의 DOM 상태를 가져오고, 여기서 리턴하는 값은 componentDidUpdate에서 3번째 파라미터로 받아올 수 있게 된다.
(componentDidUpdate(prevProps, prevState, snapshot))
componentDidMount()
컴포넌트가 마운트 된 직후에 호출된다.
외부에서 데이터를 불러와서 넣어줘야 할때 네트워트 요청을 보내기 좋은 위치이다.
componentDidMount에서 setState를 호출하는 경우(ex) 외부 데이터 셋팅 등) render()가 두번 호출된다.
최초 렌더링 직후 => setState로 인한 리렌더링 : 화면 갱신전에 일어나서 두번의 렌더링이 눈에 띄진 않지만 성능상의 문제로 이러질 수는 있다.
componentDidUpdate()
최초 렌더링에서는 호출되지 않고 업데이트, 리렌더링 직후 호출된다.
리렌더링 되는 경우는 다음과 같다.
props가 바뀔 때state가 바뀔 때- 부모 컴포넌트가 리렌더링 될때
- 강제로 트리거를 발생시킬때(
this.forceUpdate: 무조건 리렌더링 시킴)
componentDidUpdate()에서 setState를 사용하면 무한 렌더링이 발생될 수 있으니 주의해야 한다.
componentWillUnmount()
컴포넌트가 마운트가 해제되어 제거되기 직전에 호출된다.
타이머 제거, 네트워크 요청 취소, componentDidMount()에서 생성된 작업 등을 정리할 때 사용된다.
실행 직후 컴포넌트는 렌더링 되지 않으므로 setState()를 호출하면 안된다.
componentDidCatch
render()에서 에러 발생시 유용하게 사용할 수 있다.
componentDidCatch(error, info) {
  this.setState({
    error: true
  });
}
state.error를 true로 설정하게 하고, render 함수쪽에서 이에 따라 에러를 띄워준다.
주의
컴포넌트 자신의 render()에서 에러가 발생하는 것은 잡아낼 수 없지만, 컴포넌트의 자식 컴포넌트 내부에서 발생하는 에러들을 잡아낼 수 있다.
Discussion and feedback